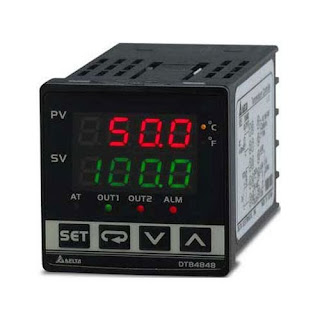
Delta Products, DTB Series Temperature Controller's PID Controls
| Temperature Controllers,PID Controls,Delta Products |
Welcome Friends! Today, I will be showing you to navigate through the settings of the Delta Products DTB Series Temperature Controllers for PID control.
The DTB series has three modes of operation which include operation,regulation and initial setting. When power is applied, the controller goes into the operation mode.
how to navigate and set up
- I can press the set key to switch briefly to enter regulation mode.
- If the set key is pressed for more than 3 seconds, the controller will switch to the initial setting mode.
- Pressing the set key while in the regulation mode or initial setting mode, forces the controller to return to the operation mode.
The PV and SV sets the temperature set point and displays the temperature process value.
Using the arrow keys allows for me to set the temperature set point.
Before this can be done, I will need to define some settings. I will enter the initial setting mode by holding the set button. The first setting allows me to select the input sensor type. The sensor type can be an analog input, platinum resistance or thermocouple. I can change this by pushing the arrow keys to edit.
For demonstration purposes, I will set this setting to thermocouple type k and then push set button to save.Adjusting this will send me to the operation mode. I will need to hold down set for a few seconds to enter the initial settings again. To toggle between the possible settings, I can push the return button.
The next setting here is to set the temperature unit. Right now the unit is set for Celsius to adjust this I will push the arrow key down. I can change the C to an F and then press set to save. Now that I have adjusted a couple of basic settings, I will go back into the initial setting mode and scroll through the settings to show what they are. I will use the return key to find the appropriate settings and not the arrow keys.
tp-H :- sets the upper limit of temperature range,
tp-L:-sets the lower limit of temperature range,
CTRL:- sets the control mode,
S-HC sets the heating and cooling control or allows me to change to dual loop output control.
ALA 1, 2 and 3 set the three alarm mode settings.
SALA sets the system alarm
COSH enables or disables communication formats selection,
C-SL sets ASCII or RTU communication formats,
C-NO adjusts the communication address settings,
BPS sets the communication baud rate setting,
LEN sets the data length setting.
PRTY is the parity bit setting
And the last setting is
Stop for the stop bit setting.
To further show the complete list of operational commands,
I will need to enable the alarm functions. I will scroll back to alarm 1 and change the value to a 1. I will push set to save and then push it again to go back to the operation mode.
Next, I will enter regulation mode by pushing set briefly.
Delta Controllers
First is,
AT or Auto tuning.
I can switch this on by pushing the arrow up and then set to save. Scrolling down with the return key,
I have PID zero.
This value sets the PID mode selection. Any one of 4 PID modes can be selected from zero to three.
When this is set to the number 4, the program will automatically select a PID mode that is most useful for the target temperature. I will use the arrow keys to move to 4 and then push set to save. The next values correspond to the PID mode.
The SU0 indicates which group this is by the zero value had I put in a 1 for mode selection, there would have been an SU 1 instead.
Scrolling through, I have proportion band setting, Tisetting, Td setting and integral deviation setting.
If the Ti setting is 0, I can set the PD control offset setting, but since the Ti setting was not adjusted, the next value to regulate in scrolling is HTPD or the heating control cycle setting. This could also appear as CLPD for cooling control cycle if the setting S-HC in initial settings was changed for cooling control. The last setting is TPOF stands for regulate temperature deviation value.
Now, I will go back into operation mode. I can use the arrows to adjust the temperature set point. Using the return key allows me to access the operation mode options.
The first one R-S controls setting run or stop, SP defines the decimal point position. Since I allowed for the alarm to be enabled in initial mode, I have AL1H for the upper-limit alarm 1 and then AL1L for the lower limit alarm. I will continue to scroll down and LOC should appear on the screen for setting lock mode, then OUT 1 which will display the value of the 1st output. This displays in PID control mode and manual run mode only.
This completes an overview for PID settings using the DTB series.


0 comments:
Please do not enter any spam link in the comment box.